Introduction
aaPanel is a Chinese alternative of a web server control panel like cPanel and Vesta. Developed by BT.cn it is currently at version v6.8.5 (at the moment of the writing). It is free, mature enough, and features some really nice stuff like editor, uploader, file manager, backups and Nginx preconfigured rules. Also it is user friendly and offers GUI for most of the essential Linux services, making your job managing a web server easier.
While aaPanel is a popular choice, remember that Webdock comes with its own powerful free vps control panel pre-installed.
In this tutorial we will install, secure and configure aaPanel for a basic development and production use as well as pointing a domain to our server and aaPanel itself.
Beginner level
This guide is beginner friendly and aaPanel is a decent alternative for your first web server. You will learn how to host your own web site and/or other web projects. Also, it is meant for a people who are looking to move from shared hosting plans to a fully fledged web host controlled by you.
Even if you are a total beginner, we encourage you to continue with this tutorial. Advanced knowledge is preferable, but not mandatory. At the very least you need to have a basic grasp on how web technology works.
Prerequisites
Please make sure you fulfill the prerequisites for this tutorial.
- Fresh & clean Ubuntu Jammy 22.04 installation
- You have a registered and valid domain (preferable with no DNS records, aka new)
- User with root privileges (sudoer) – You will need shell access, read more here on how to get shell access to your server
Blank image – Webdock users
WEBDOCK USERS ONLY If you are experimenting with your own server instance outside Webdock infrastructure skip this section.
From Webdock interface, select your hardware, location, name and slug as you prefer. As an image, choose Jammy Jellyfish, clean install of the Ubuntu Jammy v22.04.
When it comes to user creation it is very important to put the user in the sudo group. Choose username something different from the admin, superadmin and similar. For authentication methods you have two options: via Public Access Keys and Password authentication. For beginners, password authentication might be the easiest way to start, but use a very strong password.
Create your server and log in by terminal: enter your server IP or or alias Webdock created for you (something like yourservername.vps.webdock.io), user name and password.
Install aaPanel
Installing is pretty much straight forward. First, let’s switch to root.
$ sudo su -
Update and upgrade current OS installation
# apt-get update; apt-get upgrade -y;
Run aaPanel installation script – you may want to check the aaPanel website for the exact download link below as they release new versions often.
#URL=https://www.aapanel.com/script/install_7.0_en.sh && if [ -f /usr/bin/curl ];then curl -ksSO "$URL" ;else wget --no-check-certificate -O install_7.0_en.sh "$URL";fi;bash install_7.0_en.sh aapanel
Here is the list of answers installation script going to ask you:
> Do you want to install aaPanel to the /www directory now?(y/n): y

Do you need to enable the panel SSl ? (yes/n): n
After installation, you should see something like this:
 Write down URL access page, your username and password and log in for a first time. After successful login, you should see a screen similar to this:
Build the Web Server Stack
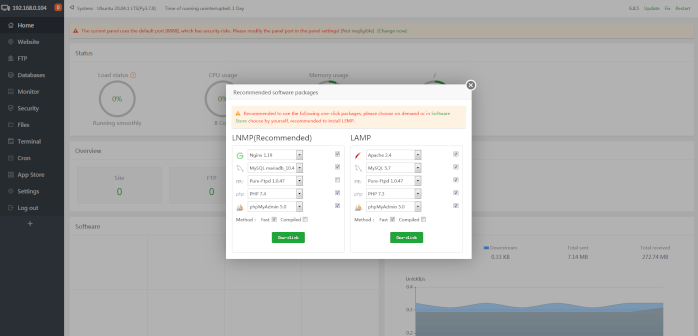
In this tutorial we will build LEMP stack (left panel). Select software exactly like shown in the picture below.
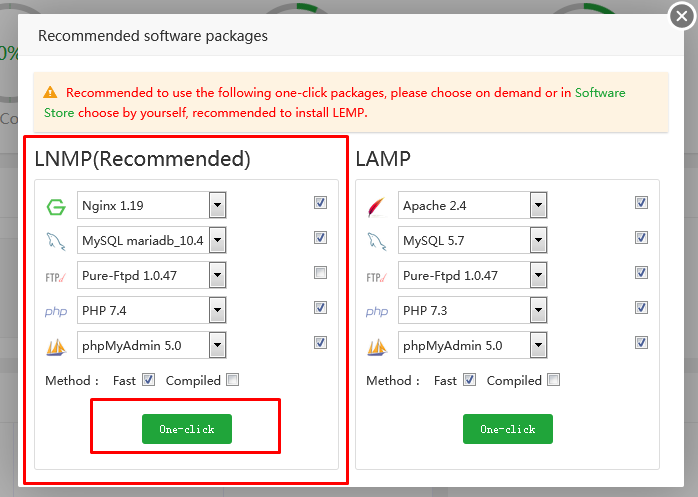
Installing Nginx is essential for this step, while everything else can be installed later on.
Our next step is to populate our PHP with necessary extensions. Go visit app store from panel, and under PHP7.4 select settings.
From pop-up window you will see all kinds of settings for the selected app (PHP7.4 in our case). Whenever you make changes throughout this window and hit SAVE, changes will apply automatically and the service is restarted.
Go to Install extensions and select these: fileinfo, opcache, memcached, redis, apcu, imagemagick, exif, intl, xsl, readline, pspell.
Notice: Right after aaPanel installation, the first time you visit app store, the panel might freeze. This situation may occur several times, until the app list is populated completely. This behaviour is well known, just reload panel. Soon as the app store populates list fully, everything works fine.
These extensions is something close to what Webdock suggests in our own stacks. If you have to install another PHP version, repeat this process for it. Worth mentioning, the redis extension installed is actually PhpRedis module + Redis app itself.
Next step is to install some more necessary apps from the App store: PM2 Manager, Redis (if not installed), Fail2ban, OneClick Deployment, SYS Firewall. This is not a definite list, but it is a good start.
Point your domain to your server
In this section of the tutorial we configure DNS records for your domain. Regardless of where you bought your domain, the masks shown here are very similar but may vary. For general information on how to point DNS to your Webdock server with links to documentation for common DNS providers / registrars, click here.
Go to your registrar website, select domain you wish to point to this server, and go to an ADVANCED DNS ZONE editor.
| Type | Host/Name | Value | ttl |
| A | @ (or domain name example.com) | IP4 (your server IP in form 90.90.90.90) | automatic or 14400 |
| AAAA | @ (or domain name example.com) | IP6 (your server IP in form 2a06:1301 …) | automatic or 14400 |
| A | www (or www.example.com) | IP4 (your server IP in form 90.90.90.90) | automatic or 14400 |
| A | panel (or panel.example.com) | IP4 (your server IP in form 90.90.90.90) | automatic or 14400 |
Here we pointed ourmain domain and two subdomains to our server. It may take some time to changes took effect.
Test your server and domain
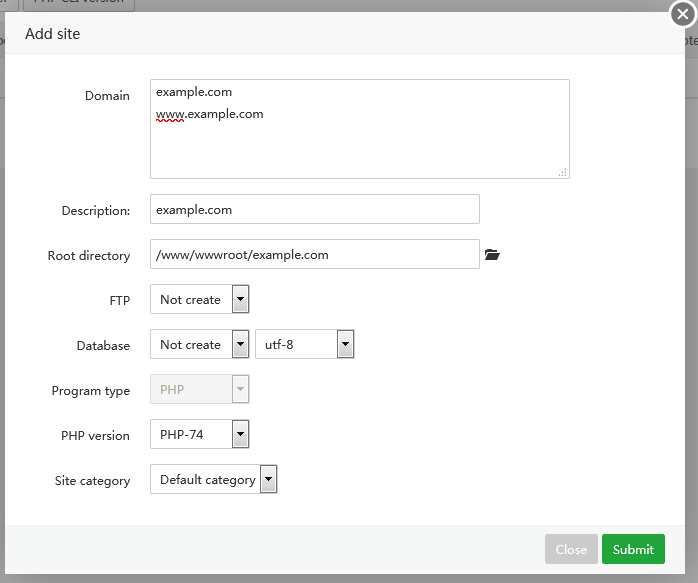
From aaPanel go to Website > add site.
Populate fields like from the image below. Replace example.com with your domain.
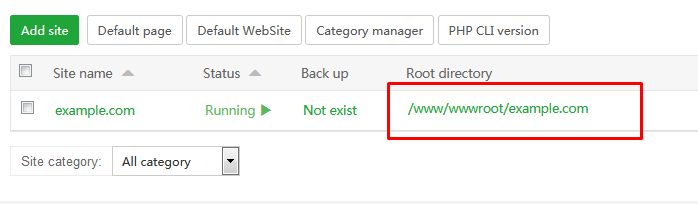
 I generally hate generic HelloWorld pages, so for a bit of fun if you want, download the Welcome page we created for this article from this link, upload it to the website root directory and decompress it.
 Visit your domain from your browser and if everything is OK, you should see a green welcome screen. As green as the GTMetrix score from every globe location just out of the box :-).
Now, apply SSL to your domain and subdomain.
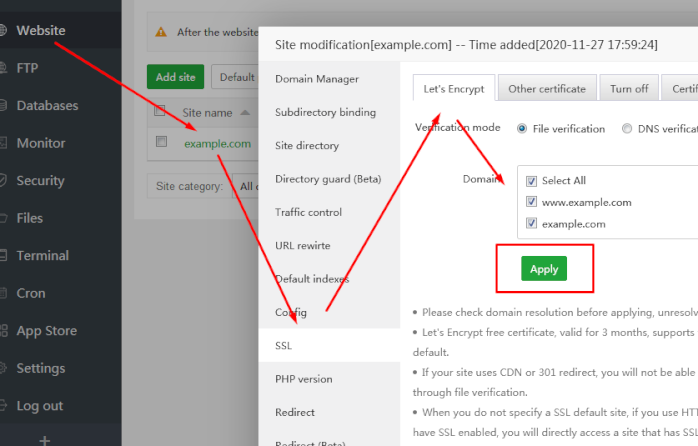 After successfully applying the SSL certificate, you can later (after completion of the tutorial) turn on Force HTTPS option. This is generally recommended.
What is left is to activate our “panel” subdomain which we need for the next section of our tutorial. Repeat above process with slight changes. Add site (panel.example.com), upload blank page, enable SSL but do NOT turn on FORCE HTTPS!
For Webdock users: Now is a good time to visit your Webdock dashboard and create a snapshot of your server. In next section several things can go wrong and server backup can save you a lot of time.
Secure your web server
First we will check the status of the Fail2ban. Go to App Store > Fail2ban.
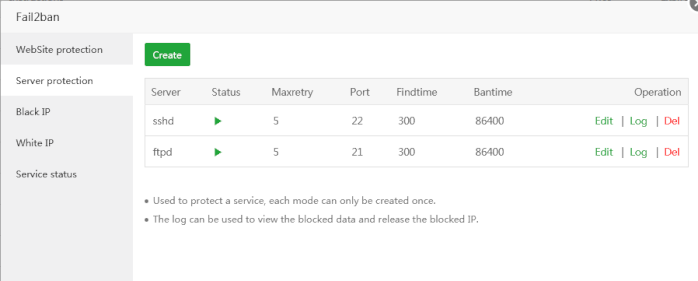 If your settings look like the image above everything is fine. We actually do not have 21 port opened at all, but let it stay there if you ever want to install FTPD service later.
Next we are going to attach the new port where our aaPanel will reside as one of the security measures. Go to App Store > Search for “Sys Firewall” > Setting > Port Rules > Add Rule. Set some random port between 8888-65535 and name it something like “New aaPanel port”
Visit the Settings page of the aaPanel and change the port to the newly created one. Stay on the Settings page and change these things as you prefer:
- Timeout: 7200 (2hrs inactivity and you have to login again)
- Security Entrance: login URL; set something meaningful to you (my-secret-entranceXXX)
- Panel user: your new user name
- Panel password: your new VERY STRONG password
The last thing we need to do is secure connection to your aaPanel. Double check if your panel subdomain works. On the Settings page, fill Domain field eg. panel.example.com (panel.YOUR_TRUE.DOMAIN)
After successful login to the aaPanel, you can go and turn ON panel SSL. The panel will recognize the SSL certificate we already installed for the subdomain and all you have to do to approve it.
If everything is fine you successfully configured your web server with the aaPanel. Create another snapshot and start experimenting further.
Series Author: Aleksandar Milivojevic is a PHP programmer for over 10 years (Laravel and WordPress). Writing articles in brief pauses between projects, to help out the community and popularize PHP in general.
