JSON Web Tokens and Laravel API custom filtering (JWT) (Part 4)
Last updated: May 25th 2021
Introduction
After successful implementation of the database for JWT, in this article we will discuss additional features and potential use of our tokens. First, we will introduce two more security layers: filtering by IP and by device. The second will be resource token; granting access to personal data to the third party clients. Let's go.
Updating the Token Model
First, let's enlarge our token model and update database with new columns.
$ php artisan make:migration add_columns_to_tokens_table --table=tokens
...then, open the newly created migration file xyz_add_columns_to_tokens_table.php and fill it with code:
<?php

use Illuminate\Database\Migrations\Migration;
use Illuminate\Database\Schema\Blueprint;
use Illuminate\Support\Facades\Schema;

class AddColumnsToTokensTable extends Migration
{
    /**
     * Run the migrations.
     *
     * @return void
     */
    public function up()
    {
        Schema::table('tokens', function (Blueprint $table) {
            $table->string('ip', 50)->after('user_id')->nullable();
            $table->string('device', 200)->after('jti')->nullable();
            $table->json('grants')->after('payload')->default('[]');
        });
    }

    /**
     * Reverse the migrations.
     *
     * @return void
     */
    public function down()
    {
        Schema::table('tokens', function (Blueprint $table) {
            $table->dropColumn('ip');
            $table->dropColumn('device');
            $table->dropColumn('grants');
        });
    }
}
... and edit two variables in the Token.php model file as:
    protected $fillable = array(
      'user_id',
      'ip',
      'value',
      'jti',
      'device',
      'type',
      'pair',
      'status',
      'payload',
      'grants'
    );

    protected $casts = [
      'payload' => 'array',
      'grants' => 'array'
    ];
Finally, run artisan migration command to apply changes to the database:
$ php artisan migrate
This migration should not affect your existing rows in the database.
IP Filtering
In this section we will introduce IP filtering for our tokens, e.g. after logging on client IP is bounded to the referring tokens, forbidding client to access once IP is changed.
This feature might not be useful for mobile apps as is. Once the user leaves their home wifi, application request another login for example. This can be frustrating, but what if the user leaves the country? In that case we are dealing instead of the one IP, with a range of IPs, and that can be very useful and implementation is very similar. Also, for server to server connections, filtering IP is a MUST, or at least domain filtering whose implementation is almost the same.
Helper class
Let's build a helper class to store our additional functions. Create app/Helpers/JwtApi.php and insert code
<?php
namespace App\Helpers;

use Illuminate\Support\Facades\Auth;
use \Exception;

class JwtApi
{
  /**
   * RETURN VISITORS REAL IP
   * @return string
   */
  public static function getIp(){
    foreach (array('HTTP_CLIENT_IP', 'HTTP_X_FORWARDED_FOR', 'HTTP_X_FORWARDED', 'HTTP_X_CLUSTER_CLIENT_IP', 'HTTP_FORWARDED_FOR', 'HTTP_FORWARDED', 'REMOTE_ADDR') as $key){
      if (array_key_exists($key, $_SERVER) === true){
        foreach (explode(',', $_SERVER[$key]) as $ip){
          $ip = trim($ip); // just to be safe
          if (filter_var($ip, FILTER_VALIDATE_IP, FILTER_FLAG_NO_PRIV_RANGE | FILTER_FLAG_NO_RES_RANGE) !== false){
            return $ip;
          }
        }
      }
    }
    return \Request::ip(); //No IP found, return Laravel default
  }

}
As you can see our helper class contains only one function getIp() so far. This custom function is acceptable solution you can find around the web, since $request->ip() will return the wrong IP if your app is under load balancer. More about this issue here.
Register helper class under aliases in the config/app.php:
'aliases' => [
.
.
.
'JwtApi' => App\Helpers\JwtApi::class, //Helper we added
Register IP on login
Open AuthController.php and make these changes:
Under namespace directive add:
Use JwtApi;
...and change these two variables in respondWithToken() function to look like these:
      $access_token_obj = Token::create([
        'user_id' => auth()->user()->id,
        'value' => $access_token, //or auth()->getToken()->get();
        'jti' => auth()->payload()->get('jti'),
        'type' => auth()->payload()->get('xtype'),
        'payload' => auth()->payload()->toArray(),
        'ip' => JwtApi::getIp()
      ]);

      $refresh_token_obj = Token::create([
        'user_id' => auth()->user()->id,
        'value' => $refresh_token,
        'jti' => auth()->setToken($refresh_token)->payload()->get('jti'),
        'type' => auth()->setToken($refresh_token)->payload()->get('xtype'),
        'pair' => $access_token_obj->id,
        'payload' => auth()->setToken($refresh_token)->payload()->toArray(),
        'ip' => JwtApi::getIp()
      ]);
The best place to check IPs is JwtMiddleware.php. So, open it and add this code just before return directive (also add use JwtApi; under namespace in the same fashion)::
		if ($token_obj->ip != JwtApi::getIp() ){
			return response()->json(['status' => 'Token Invalid for this IP'], 403);
		}
Now you can test the me route and see what happens. If you have done everything properly nothing will happen. Which is good. To test this feature you will have to change own IP after issuing token, but you can check IP column in token database.
When you are in local development environment, your true IP will be hard to catch. In best case it will be server IP or router IP. Once your API requests go through your ISP infrastructure your true IP will be revealed.
User Device - User Agent
In this section we are going to do almost the same thing, but with different server variable. From official documentation:
'HTTP_USER_AGENT' Contents of the User-Agent: header from the current request, if there is one. This is a string denoting the user agent being which is accessing the page. A typical example is: Mozilla/4.5 [en] (X11; U; Linux 2.2.9 i586). Among other things, you can use this value with get_browser() to tailor your page's output to the capabilities of the user agent.
This feature is useful to show up user all valid tokens and the devices they are issued for. Without too much commenting (since analogy is the same) add the code below:
app/Helpers/JwtApi.php
  public static function getUserAgent(){
    //this is a good place to detect mobile devices etc.
    return $_SERVER['HTTP_USER_AGENT'];
  }
AuthController.php
      $access_token_obj = Token::create([
        'user_id' => auth()->user()->id,
        'value' => $access_token, //or auth()->getToken()->get();
        'jti' => auth()->payload()->get('jti'),
        'type' => auth()->payload()->get('xtype'),
        'payload' => auth()->payload()->toArray(),
        'ip' => JwtApi::getIp(),
        'device' => JwtApi::getUserAgent()
      ]);

      $refresh_token_obj = Token::create([
        'user_id' => auth()->user()->id,
        'value' => $refresh_token,
        'jti' => auth()->setToken($refresh_token)->payload()->get('jti'),
        'type' => auth()->setToken($refresh_token)->payload()->get('xtype'),
        'pair' => $access_token_obj->id,
        'payload' => auth()->setToken($refresh_token)->payload()->toArray(),
        'ip' => JwtApi::getIp(),
        'device' => JwtApi::getUserAgent()
      ]);
JwtMiddleware.php
		if ($token_obj->device != JwtApi::getUserAgent() ){
			return response()->json(['status' => 'Token Invalid for this device'], 403);
		}
Again, test against me route and if nothing happens, it's all good. Now, let's change User-Agent header from Postman to provoke the error. Do edits like in the image below.
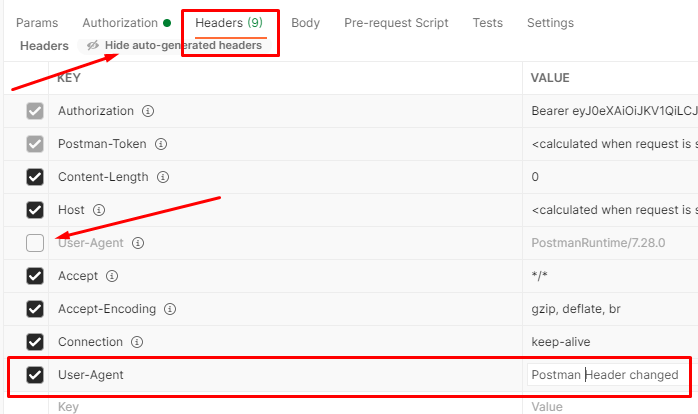
...now check the me route and see the result.
You may notice, we did not burden the token payload with additional data, but used our database for that. That is in direct correlation with our statement from the beginning: keep tokens lightweight, and do not reveal too much information!
In the above two sections I explained most common side use of the tokens in modern day applications. It is up to you what to implement in your own app, and for what purpose. As I mentioned before, the main purpose of this series is to show what can be done and give you an idea, not how it must be done.
Resource Token and Custom Grants
In this section we will simulate a situation where user grants some of own personal data to a third party subject. It is similar action where you as a Facebook user allows access to personal photos or posts to generic FB app. This kind of tokens is usually mixed with IP and domain filtering, which we explained section above, or similar filters with a same logic.
Here we are going to create two routes, controller and middleware. In api.php add new route inside AUTH block:
Route::post('token/issue', [App\Http\Controllers\AuthController::class, 'tokenIssue']);
Add new function in AuthController.php
public function tokenIssue(Request $request){
      $validate = Validator::make($request->all(), [
        'id' => 'required|boolean',
        'name' => 'required|boolean',
        'email' => 'required|boolean'
      ]);

      if ( $validate->fails() ){
        return response()->json(['message' => 'Error! Bad input.'], 400);
      }

      $resource_token = auth()->claims([
          'xtype' => 'resource'
        ])->setTTL(60 * 24 * 365)->tokenById(auth()->user()->id); //expire in 1 year

      $resource_token_obj = Token::create([
          'user_id' => auth()->user()->id,
          'value' => $resource_token,
          'jti' => auth()->setToken($resource_token)->payload()->get('jti'),
          'type' => auth()->setToken($resource_token)->payload()->get('xtype'),
          'pair' => null,
          'payload' => auth()->setToken($resource_token)->payload()->toArray(),
          'grants' => [
            'id' => $request->input('id'),
            'name' => $request->input('name'),
            'email' => $request->input('email')
          ],
          'ip' => null,
          'device' => null
      ]);
      return response()->json(['token' => $resource_token]);
    }
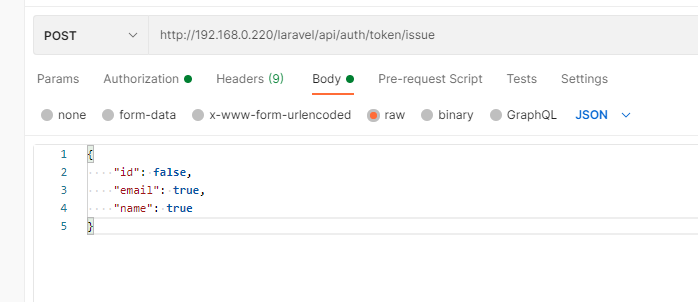
Now you can issue resource token for further use. In postman at /api/auth/token/issue route fill BODY in Postman in this manner:
{
    "id": false,
    "email": true,
    "name": false
}
Our next step is to build a logic for usage of our new token. Edit api.php and add a new route group:
Route::group([

    'middleware' => 'api',
    'prefix' => 'resource'

], function ($router) {

  Route::get('user', [App\Http\Controllers\ResController::class, 'user']);

});
...and create ResController.php
$ php artisan make:controller ResController
then fill file with code:
<?php

namespace App\Http\Controllers;

use Illuminate\Http\Request;
use Illuminate\Support\Facades\Validator;
use JWTAuth;
use Tymon\JWTAuth\JWT;
use Exception;

use App\Models\User;
use App\Models\Token;
use JwtApi;

class ResController extends Controller
{
  /**
   * Create a new ResController instance.
   *
   * @return void
   */
  public function __construct()
  {

    $this->middleware('jwt.xresource');
  }

  public function user (Request $request){

    $token_obj = Token::findByValue(auth()->getToken()->get());
    $grantedAttr=[];
    foreach ( $token_obj->grants as $grant=>$val ){
      if ( $val ) array_push($grantedAttr, $grant);
    }

    return response()->json(['user' => auth()->user()->only($grantedAttr) ], 200);
  }
}
All is left is new middleware /app/Http/Middleware/JwtXResource.php
<?php
namespace App\Http\Middleware;

use Closure;
use JWTAuth;
use Exception;
use Tymon\JWTAuth\Http\Middleware\BaseMiddleware;

use App\Models\Token;
use JwtApi;

class JwtXResource extends BaseMiddleware
{

	/**
	 * Handle an incoming request.
	 *
	 * @param  \Illuminate\Http\Request  $request
	 * @param  \Closure  $next
	 * @return mixed
	 */
	public function handle($request, Closure $next)
	{
		try {
			$user = JWTAuth::parseToken()->authenticate();
 		} catch (Exception $e) {
        	if ($e instanceof \Tymon\JWTAuth\Exceptions\TokenInvalidException){
				return response()->json(['status' => 'Token is Invalid'], 403);
			}else if ($e instanceof \Tymon\JWTAuth\Exceptions\TokenExpiredException){
				return response()->json(['status' => 'Token is Expired'], 401);
			}else if ($e instanceof \Tymon\JWTAuth\Exceptions\TokenBlacklistedException){
				return response()->json(['status' => 'Token is Blacklisted'], 400);
			}else{
				return response()->json(['status' => 'Authorization Token not found'], 404);
			}
		}

		$token_obj = Token::findByValue( auth()->getToken()->get() );

		if ( !$token_obj ){
			//OUR APP DID NOT ISSUED THIS TOKEN, POSSIBLE SECURITY BREACH
			return response()->json(['status' => 'Token revoked'], 403);
		}

		if ( $token_obj->payload['xtype'] != 'resource' ){
			return response()->json(['status' => 'Token Misused'], 406);
		}

		return $next($request);
	}
}
As you can see this middleware is recycled old code from previous examples with slight changes. You may break it into a smaller meaningful parts, it is up to you.
All left is to update Kernel.php with a new middleware. Add this line inside $routeMiddleware array:
'jwt.xresource' => \App\Http\Middleware\JwtXResource::class, //WE ADDED THIS!
Testing
Let's review our route list:

Login in a usual way to obtain access token. Use it to access route api/auth/token/issue and fill the BODY like on the image below.
Copy and paste new token to access the route and see results. You can experiment with different setups, but the main point is there and obvious.
Final touch
You may notice, but if you visit logoutall(), your resource token will be invalidated too. To prevent that we will make slight code change. Add this function to the User.php model:
    function authTokens() {
      return $this->hasMany( 'App\Models\Token', 'user_id' )->where('type', 'auth')->orWhere('type','refresh')->get();
    }
...and change logoutall() function in AuthController.php to call a new function
    public function logoutall(Request $request){
      foreach( auth()->user()->authTokens() as $token_obj ){
        try{
          auth()->setToken( $token_obj->value )->invalidate(true);
        }
        catch (Exception $e){
          //do nothing, it's already bad token for various reasons
        }
      }

      return response()->json(['message' => 'Successfully logged out from all devices']);
    }
Now you can visit logoutall route. All your auth tokens are invalidated while resource tokens work like a charm.
Series Conclusion
So far we learned:
- What is JWT?
- How to read and change JWT structure
- How to authorize a user
- Protect routes with middleware
- Security concerns
- Tracking your own tokens - JWT database
- Different types of tokens of different roles
I hope you enjoyed reading this series as I did writing it. I think personally it is unfair for JWT to be marginalized by the Laravel community because of the lack of the good tutorials. I hope I managed to contribute to changing that. Feel free to leave comments below.
Series Author: Aleksandar Milivojevic is a PHP programmer for over 10 years (Laravel and Wordpress). Writing articles in brief pauses between projects, to help out the community and popularize PHP in general.
<< Previous Article in this series: Database and tracking JSON Web Tokens (JWT) (Part 3)
Related articles
-
A production workflow for Laravel using Webdock servers
-
Laravel development server with aaPanel on Webdock VPS for beginners
-
Laravel development server with aaPanel on Webdock VPS for beginners - Part 2
-
Multiple Laravel installs in subfolders - Nginx rewrite rules, full guide
-
Laravel Chunked Upload - uploading HUGE files
-
The power of Laravel Queues
This guide shows how to run asynchronous jobs with Laravel
-
Laravel and Redis 5 - Introduction, Installation and basic use
-
Laravel and Redis 5 - A Functional Example
