How to Install VaultWarden on Your Webdock Server
Last updated: July 19th 2023
It can be tough to keep track of all our passwords for different online accounts - significant ones like email, banking, shopping, and social media. We're told they should be strong and unique to each site, but remembering all of them is tricky.
That's where password managers come in! They can store all your passwords securely, so you don't have to worry about forgetting them, and Bitwarden is one of the popular password managers. There are two versions of Bitwarden: Commercial and Self-hosted for ultra-privacy enthusiasts.
Vaultwarden is a Bitwarden server alternative written in Rust. It supports connections from Bitwarden clients and is less resource-intensive than the official Bitwarden service. This tutorial explains how to install Vaultwarden on Ubuntu using Docker and docker-compose, and securing the configuration with Caddy.
Prerequisites
- A Plain Ubuntu Server (Ubuntu Jammy in my case)
- Fully Qualified Domain (Can be a subdomain)
Installing Docker
Docker is a software platform that enables you to build applications using containers. Containers are small and lightweight execution environments that use the operating system kernel but otherwise run in isolation from each other. This allows you to package your application with all its dependencies, making it easy to deploy and run on any system.
To install Docker, please refer to Webdock’s official guide here.
Installing Docker Compose plugin
Manually fetching docker-compose binary is no longer necessary as Docker now provides a compose package. If you've installed Docker using our guide, then you've installed compose as well.
If in case you already use the "docker-compose" command to deploy containers, then that should work too. You'll need to follow the rest of this guide and do "docker-compose up -d" instead.
Creating a Docker Container Config
I will create a docker container using the compose plugin.
To do so, make a new folder in your home directory called vaultwarden, and enter it:
$ mkdir ~/vaultwarden
$ cd ~/vaultwarden
Then create a Docker Compose configuration file:
$ nano docker-compose.yml
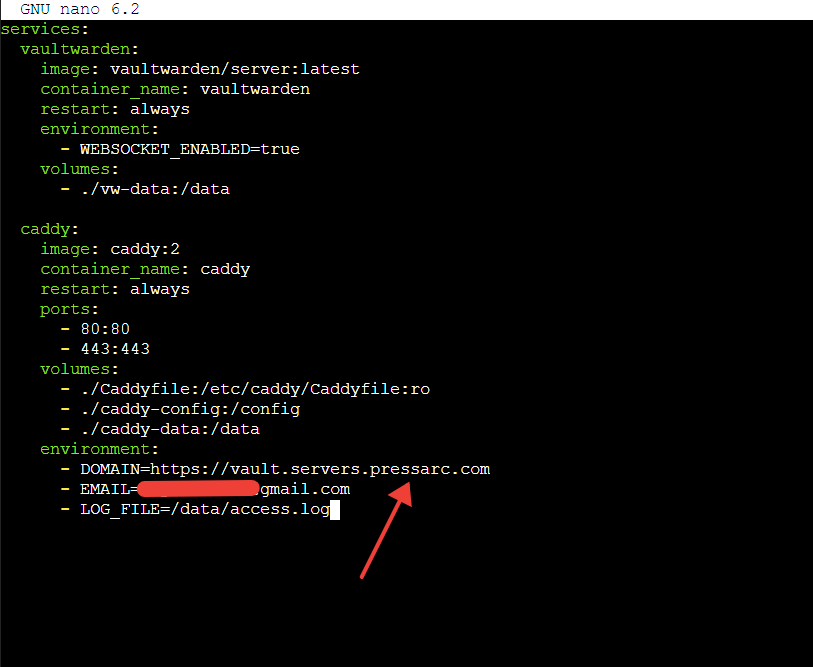
And add the following, save and exit:
version: '3'

services:

  vaultwarden:
    image: vaultwarden/server:latest
    container_name: vaultwarden
    restart: always
    environment:
      - WEBSOCKET_ENABLED=true
    volumes:
      - ./vw-data:/data

  caddy:
    image: caddy:2
    container_name: caddy
    restart: always
    ports:
      - 80:80
      - 443:443
    volumes:
      - ./Caddyfile:/etc/caddy/Caddyfile:ro
      - ./caddy-config:/config
      - ./caddy-data:/data
    environment:
      - DOMAIN=https://example.com
      - EMAIL=any@domain.com
      - LOG_FILE=/data/access.log
Ensure to replace example.com and the email with your domain and email, respectively.
To check for syntax errors, run:
$ docker compose config
If you see no errors, you should see the contents of the YML file, else re-check if you made mistakes while copy-pasting the content or when replacing the domain and email data.
Configure Caddy
Caddy is an open-source web server platform designed to be secure and easy to use. Due to its lightweight, I will use Caddy to reverse proxy our Docker container.
The first thing is to create a configuration file for Caddy called Caddyfile:
$ nano Caddyfile
Add the following to the same, save, and then exit:
{$DOMAIN}:443 {

  log {
    level INFO

    output file {$LOG_FILE} {

      roll_size 10MB

      roll_keep 10
    }

  }

  # Get a cert by using the ACME HTTP-01 challenge.

  tls {$EMAIL}
  encode gzip

  # Headers to improve security.

  header {

  # Enable HSTS

  Strict-Transport-Security "max-age=31536000;"

  # Enable cross-site filter (XSS)

  X-XSS-Protection "1; mode=block"

  # Disallow the site to be rendered within a frame (clickjacking protection)

  X-Frame-Options "DENY"

  # Prevent search engines from indexing

  X-Robots-Tag "none"

  # Remove Caddy branding

  -Server

  }

  # Redirect notifications to the WebSocket.

  reverse_proxy /notifications/hub vaultwarden:3012

  reverse_proxy vaultwarden:80 {

       header_up X-Real-IP {remote_host}

  }

}
These lines in the Caddyfile configure Caddy to forward HTTPS requests from port 443 to Vaultwarden. It also adds additional headers to improve security, including HTTP Strict Transport Security (HSTS) and Cross-Site Scripting (XSS) protection.
Starting the Vaultwarden instance
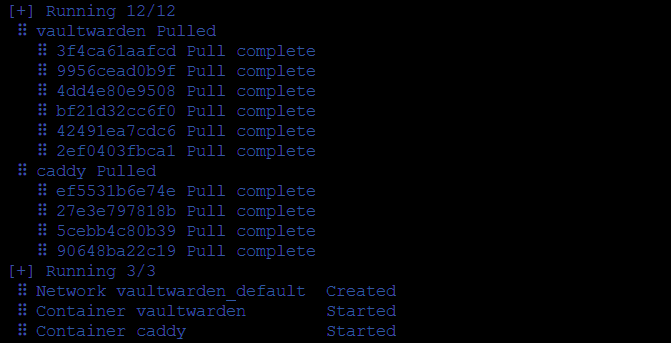
Now, this is simple. Starting up Vaultwarden can take a few seconds when docker compose is detached:
$ docker-compose up -d
You should see a result like this:
Now, your self-hosted Vaultwarden instance should be accessible on your domain!
Visit https://<your-domain> and you should see this.
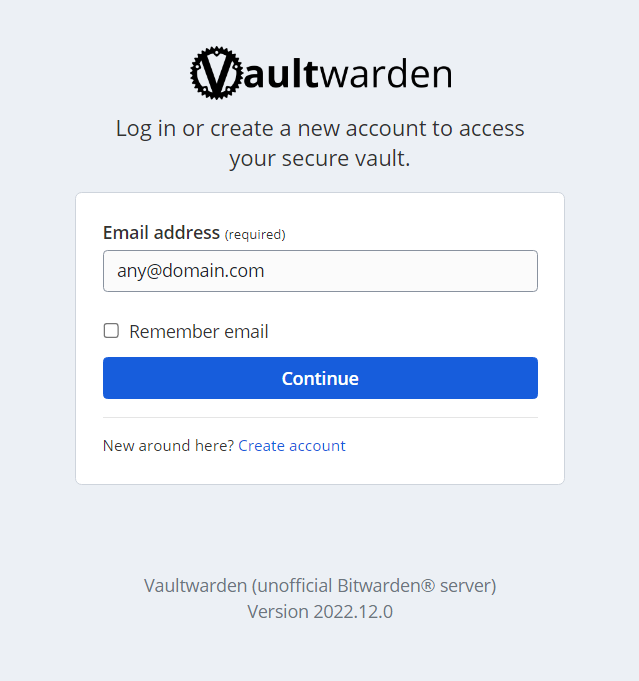
Since this is the first time, create an account by clicking on "Create Account". That's it, and now you should have a fully working Vaultwarden server.
Conclusion
This guide provided step-by-step instructions to Vaultwarden, an open-source Password Manager on your Webdock Server.
Aayush Nair has been designing WordPress websites for eight years now. He is also a content writer, writing blogs on technology and related topics, and likes helping people in his free time.
Related articles
-
How to install OpenLiteSpeed on Webdock
In this article we show you how you can install the OpenLiteSpeed web server on Ubuntu Jammy.
-
How to Deploy your First Node.js Application on your Ubuntu Web Server
-
How to set up WireGuard on your Webdock Server
This article details how you can quickly and easily install WireGuard on your Webdock Server.
-
How to set up OpenVPN on your Webdock Server
This article details how you can quickly and easily set up a VPN on your Webdock server.
-
How to Install and configure aaPanel on Ubuntu
-
How to install azuracast on Webdock
This guide shows you how to work around certain issues when installing azuracast on Webdock.
-
How to set up Runcloud on Webdock
-
How to set up cPanel on Webdock
-
How to set up Gridpane on Webdock
-
How to set up Ploi on Webdock
This article details the steps you need to go through in order to install Ploi on a Webdock server.
-
How to set up Laravel Forge on Webdock
-
How to set up Plesk on Webdock
This article details the steps you need to go through in order to install Plesk on a Webdock server.
-
How to set up Cyberpanel on Webdock
-
How to set up SpinupWP on Webdock
-
How to set up DirectAdmin on Webdock
-
How to set up Hestia on Webdock
-
How to set up Virtualmin on Webdock
-
How to install and create pipelines in Jenkins
-
Basic WordPress site setup with aaPanel
In this guide, we will install and setup a basic WordPress site with aaPanel.
-
How to use Nginx as reverse proxy and secure connections with SSL certificates
Using Nginx to proxy pass your site with SSL security.
-
Setting up monitoring with Netdata on your Webdock server
-
How to Setup Python Web Application With Flask Gunicorn and Nginx
A simple Python Flask web app hosting with Gunicorn and Nginx
-
How to Daemonize an Application with Systemd
Using systemd to autostart your application on system startup.
-
Set-up New Relic Monitoring on Your Webdock Server
This guide provides step-by-step instructions to install New Relic to monitor your VPS.
-
Getting Started with Ruby on Rails on Webdock
In this guide, we will show you how to get started with Ruby on Rails on your Webdock server
-
How to Install the Latest Version of HTOP on Ubuntu Server
Instructions to install latest htop package on your Ubuntu server
-
How to Install ImageMagick 7 on Ubuntu LEMP/LAMP stacks
Simple instructions to install ImageMagick 7 along with the PHP extension
-
A Quick Guide to Installing Rust on Ubuntu
-
How To Install Proxmox on Your Webdock Server
This article provides instructions on how to install Proxmox on your Webdock server
-
How To Run Nextcloud on Your Webdock Ubuntu Server
Instructions to Install Nextcloud on your server with Docker
-
The Ultimate Guide to Setting Up Mastodon server
A detailed guide with instructions to set up Mastodon on your Webdock server
-
A Guide To Setting Up Mindustry Game Server on Ubuntu
Step-by-step instructions to set up your own Mindustry server
